Reference manual
This reference manual covers details of LIONESS Lab. It details the experimental flow, the definition of experimental screens, their elements and the functioning of JavaScript elements. If you encounter any issues or notice that some information is missing, please do not hesitate to get in touch via info@lioness-lab.org.
Experimental Flow
In LIONESS Lab you can create LIONESS experiments. These experiments include a set of standard features enabling online interactive experiments. Here we describe these features. This section provides an overview of the structure and functioning of LIONESS experiments. Implementation issues are discussed in the develop section.
The following figure shows the flow of a typical LIONESS experiment.
Participants enter the experiment via a web link from an external website (e.g. Amazon MTurk), and are registered on the server (that is, they receive a ‘player number’, a unique number to identify them during the experiment).
They complete the experiment by navigating the pages. (Click here for a typical experimental design, including tips and tricks.)
At the end they return to the external site to collect their earnings (euro sign).
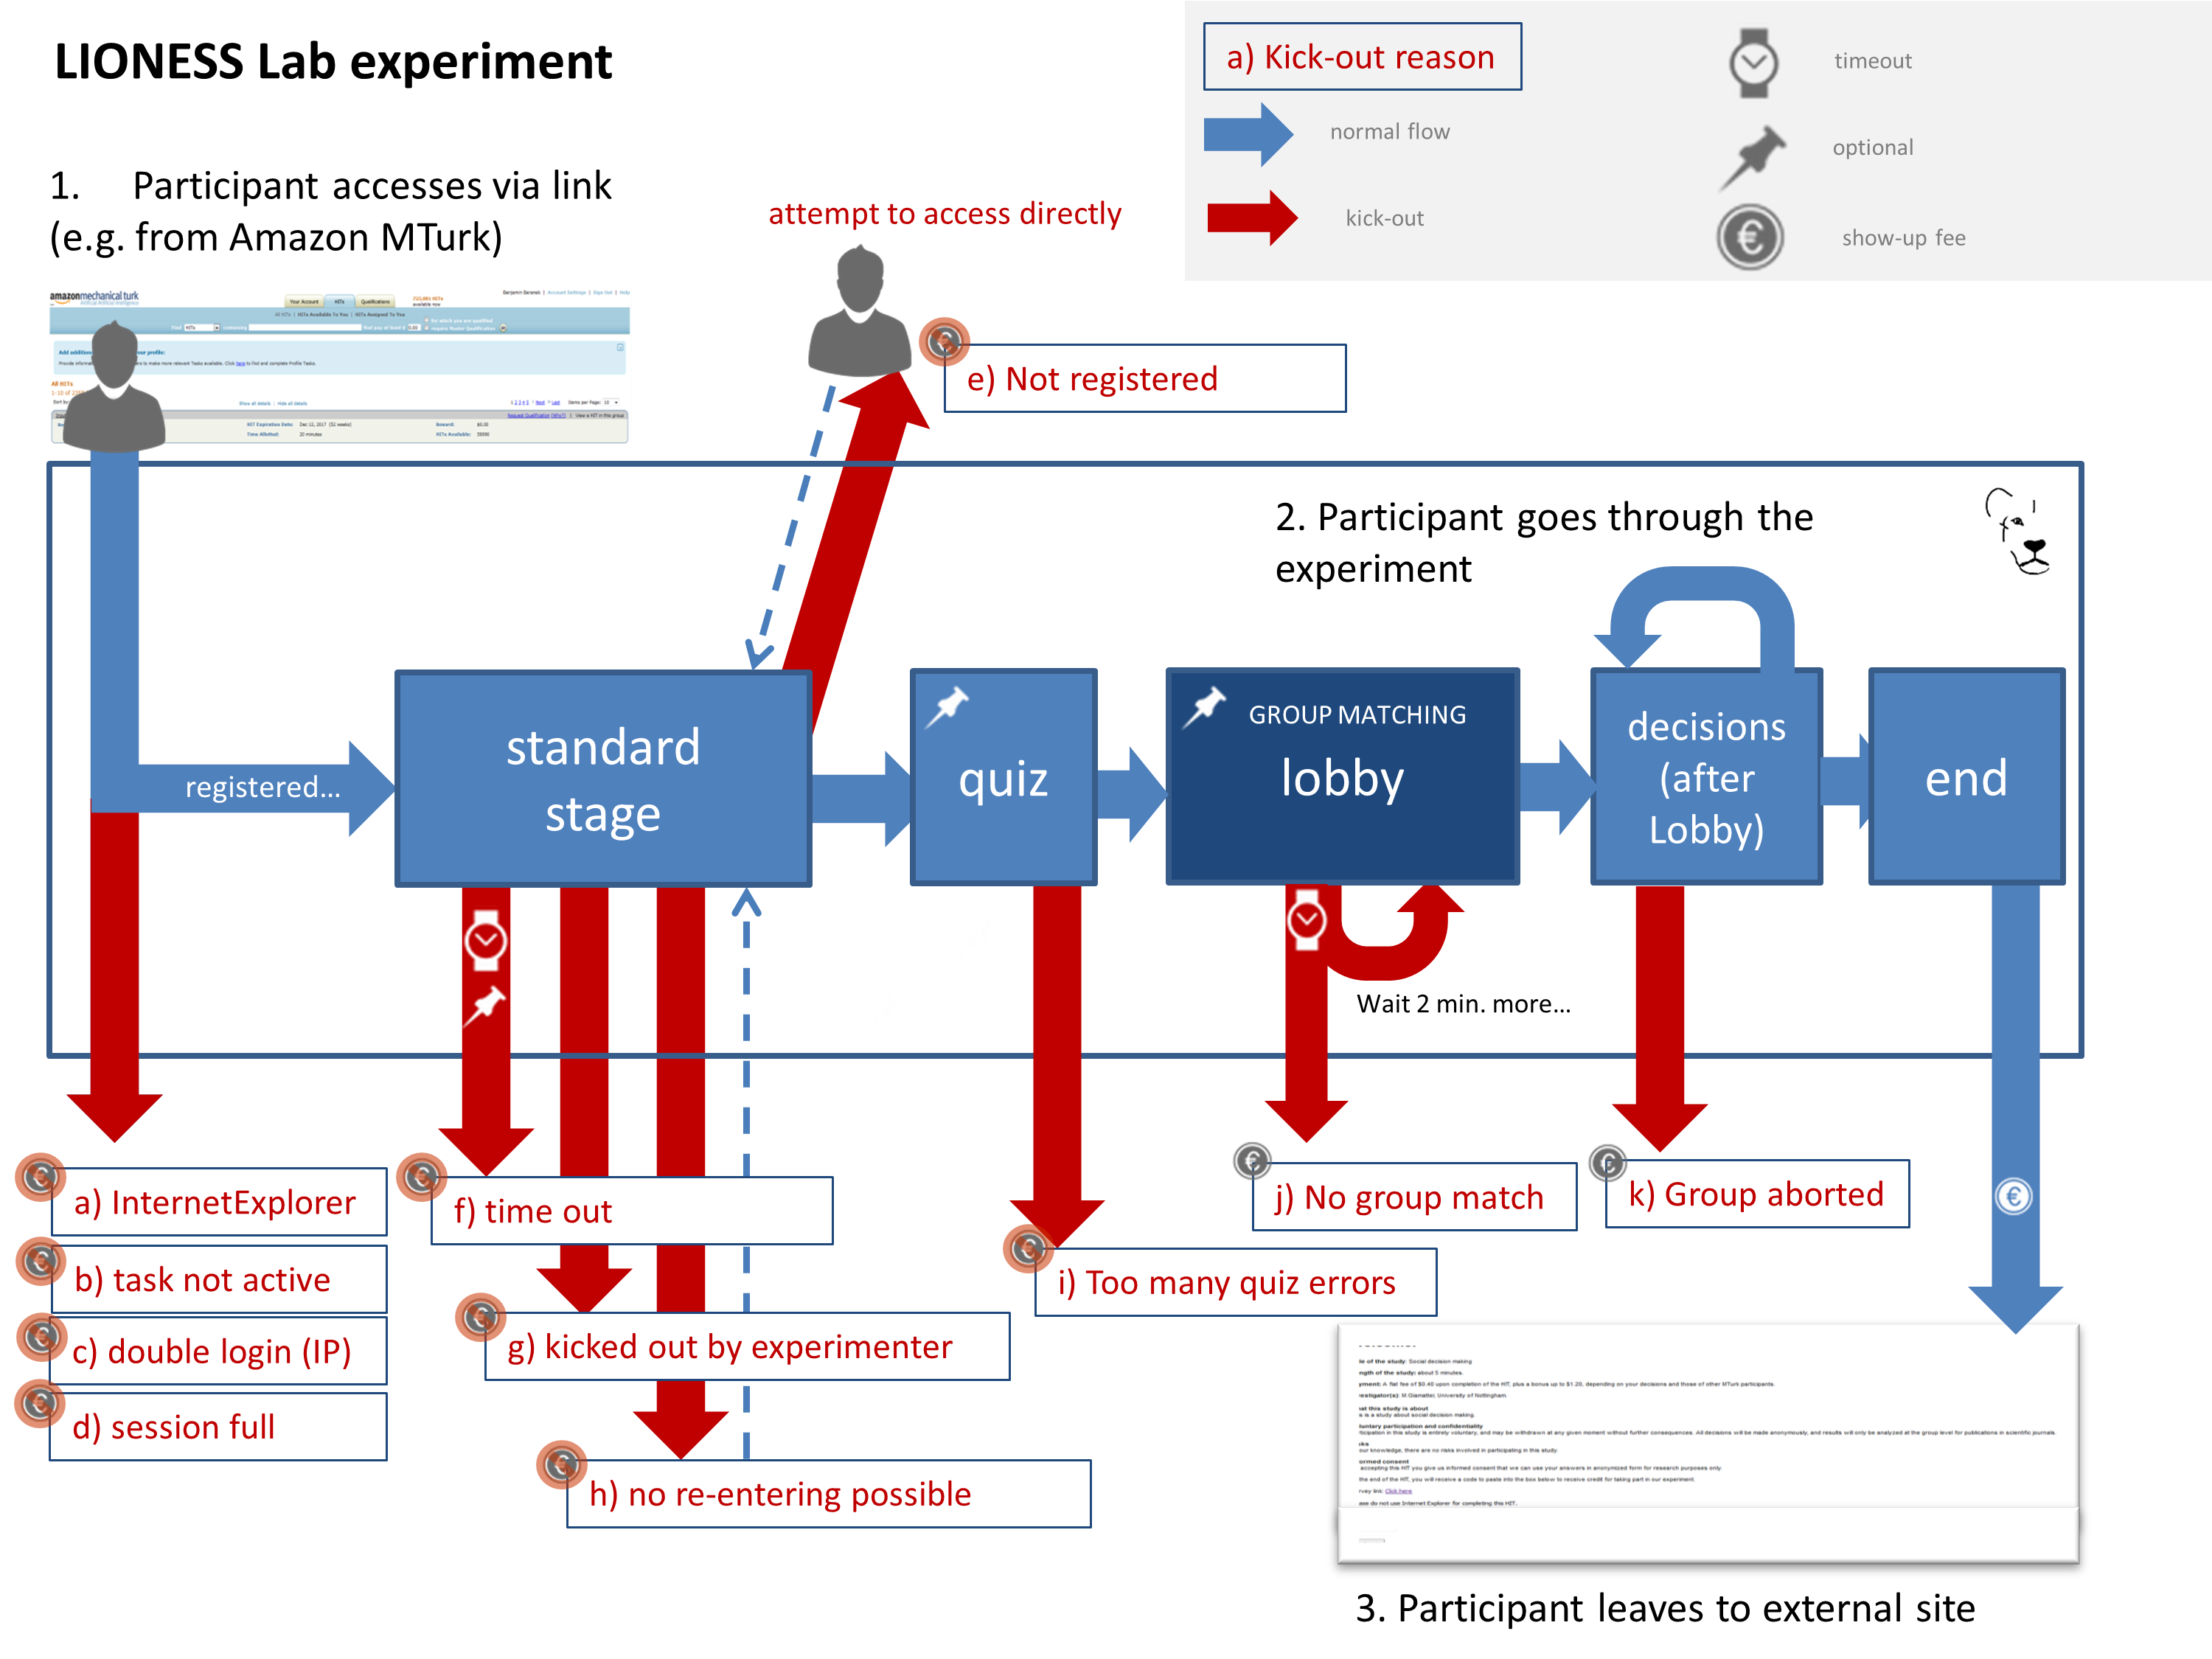
The blue arrows show the typical experimental flow. The red arrows show exceptions to the typical flow (most notably, dropouts) and the mechanisms in place that deal with those exceptions. The blue line around the experimental stages mark the boundaries of a LIONESS experiment.
When participants enter the experiment, they are registered and get a unique player number. Then they go to the first stage of the experiment (typically instructions). This is a standard stage that provides information to participants. After that, an optional quiz may follow in which participants have to answer control questions to ensure understanding. After passing the quiz, participants wait in the lobby to be matched to a group. The lobby is a key stage of an interactive experiment. It is not needed for solo tasks. Once they are matched in a group, participants make their decisions and receive feedback (possibly over several rounds). Once they completed the interactions rounds, they are informed about their payoffs. From there they are directed back to the external site (e.g. MTurk) to collect their payment.
While participants complete the experiment, various exceptions might happen. Below we list how LIONESS experiments handle these issues.
Note
Upon dropout participants receive different standard messages, which can be customized in the parameters. For all list of all messages see also here. All messages refer to the terminology HIT which is a task on Amazon MTurk.
Warning
LIONESS experiments do their best to prevent double participation by IP address check and cookies in the browser. These measures can still be circumvented with some effort.
Note
You can send parameters from MTurk (or Prolific) to your LIONESS experiment using the URL parameter ‘tic’. For example, the ‘link for participants’ you post on MTurk or Prolific could read [your_ip]/[your_experiment]/_beginParticipant.php?tic={{%PROLIFIC_PID%}}.
a) Internet Explorer
LIONESS experiments (like many other modern web applications) do not support Internet Explorer (IE). Experimenters can announce this upon recruitment (e.g. in their MTurk HIT). In case an IE user attempts to enter the experiment, they are directed to a page explaining that they cannot participate. By default, this message reads:
- message:
As indicated in our HIT text on MTurk, our HIT does not support Microsoft Internet Explorer. Please return this HIT. We apologise for any inconvenience caused.
Participants can return using a different browser.
b) Task not active
Experimenters can set the experiment inactive or active in the control panel. If the task is inactive, new participants cannot enter and receive the following default message:
- message:
This HIT is currently offline. You cannot participate at this time.
When an experiment is switched to inactive in the middle of a session (for example, when an experimenter realizes that something is wrong), participants who are already in the experiment can continue and complete the experiment.
c) Double login
LIONESS experiments record the IP addresses of participant in an anonymized way to protect personal data. With the anyonimized IP addresses it can be checked if two participants log in from the same IP address. The actual IP address cannot be retrieved.
If a login attempt is made from the same IP address, the participant is blocked and receives the following message:
- message:
According to our records, your device has already been connected to the server during this session. Participants are only allowed to enter a session once. Thank you for your understanding.
This IP address check is deactivated when the test mode is on.
Note
If you think that your participants may use the same IP address (which may be common in a laboratory setup) you may switch to test mode. Otherwise participants cannot enter the experiment.
d) Session full
In the experiment parameters, you can set the total number of players allowed into your session. When this number has been reached, further participants cannot enter anymore. They receive the message:
- message:
We have sufficient participants for this HIT. Unfortunately, you cannot participate at this time. Thank you for your understanding.
This functionality is deactivated when the test mode is on.
Note
When a participant tries to enter an experiment, the current number of participants is compared to the total number of players allowed. The current participants also include those who started the experiment but dropped out (see f), g), i), j) and k)). It is therefore often useful to set the total players higher than the number of participants you actually need.
e) Not registered
Participants can only enter a LIONESS experiment through the registration page. Navigating to a stage somewhere in the middle of an experiment without being registered leads to a page reading:
- message:
You are currently not logged in. You cannot participate in the HIT.
f) Time out
In each stage, you can define a maximum time participants have to complete the stage. This is useful to keep up the pace of the experiment (avoiding long waiting times, which risk dropouts). If a participant does not respond in time, they can be directed towards a different stage in the experiment, or to the standard time out page which shows the following message:
- message:
You did not make a decision before the time was up. You have been removed from the HIT. You can close down this window.
g) Kicked out by experimenter
In the control panel (top-right menu), experimenters can remove participants by entering their player number and click terminate player. They receive the following message and get their show-up fee:
- message:
Unfortunately, this HIT was terminated for a technical reason! You cannot continue. You will receive your guaranteed participation fee of $ $participationFee$. To collect your earnings, please fill out this random code on MTurk: $randomid$ Once you have filled out this code, you can close this window. Thank you for your participation.
Note
the values between $ signs are filled by the values set in the parameter table. Terminating participants should, of course, be done with care. This feature is intended for cases in which technical problems occur.
h) No re-entering possible
If participants try to re-enter after being removed from the experiment, they are informed that they cannot participate in the experiment anymore.
- message:
You are currently not logged in. You cannot participate in the HIT.
Note
This information that a participant has been kicked out is based on the IP address (if the test mode is switched off) and a cookie in the browser. If the participant uses a different browser from a different IP address he or she can still enter as a new participant.
i) Too many quiz errors
In the quiz stage, the experimenter can specify a maximum number of quiz failures. It the participant fails more than that, he is excluded from the experiment and receives the following message:
- message:
You did not answer the quiz correctly and were excluded from further participation.
j) No group match
In the lobby, participants wait until they are matched. You can set the maximum waiting time. If there is no other participant within that time, the participant is directed to a page where they can choose to wait an additional two minutes or to leave the experiment. In the latter case the participant is directed to a page (set by the experimenter) where they would typically be informed that they receive the guaranteed participation fee.
k) Group aborted
The experimenter can choose how their LIONESS experiment handle dropouts. In particular, it is important to define what happens to the other participants if one drops out. The default option in LIONESS experiment is continue with reduced group, so that the other group members can finish the experiment, avoiding participant disappointment and potential reputation damage on the part of the experimenter. The settings for dropout handling can be found in the handle dropouts.
If terminate group is selected as the dropout handling option, all players of the group are removed from the experiment and receive the following message:
- message:
Unfortunately, one of the players in your group dropped out of the HIT! You cannot continue. You will receive your guaranteed participation fee of $ $participationFee$. To collect your earnings, please fill out this random code on MTurk: $randomid$ Once you have filled out this code, you can close this window. Thank you for your participation.
Stage type
There are three different types of stages, the names of which are largely self-explanatory.
Standard
Standard stages are the most commonly used types. In this stage types, all Elements are available to use. This stage type is typically used for instructions, screens that require responses, and feedback screens.
Quiz
Quiz stages have the same functionality available as Standard stages, but there is one feature on top of that. For Quiz stages, LIONESS documents the number of attempts a participant needs to proceed. Typically, input Elements in quiz stages will have the field correct value defined. The variable quizFail in the session table tracks the total number of attempts a participant has made. For each player, it both stores the total and by-item number of mistakes.
For a quiz stage you can set the maximum number of attempts that participants have, using the ‘Attempts’ field. If this field is defined, participants will see how many attempts they have left. If a participant fails to solve all questions correctly within the specified number of attempts, they are sent to a page (defined in the parameters table; see ‘too many quiz errors’) telling them that they cannot participate.
Lobby
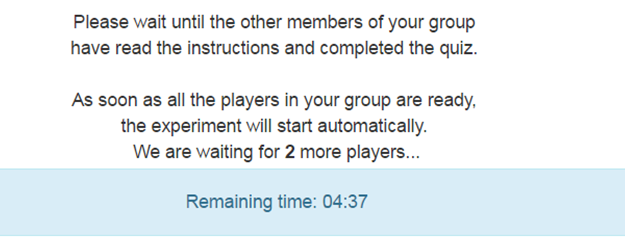
In lobby stages, participants are matched in groups. The matching procedure is defined globally in the parameter table. In case no elements are defined in a lobby stage, a default text will be shown, along with an auto-updated message indicating how many other participants are currently needed to form a group. This message gives the participants an idea how long they will have to wait before their interactive task starts (see example below).
Note
LIONESS experiments currently only support one lobby.
Matching procedures
Once sufficiently many participants are in the lobby a group can be formed. Experimenters can choose 3 types of matching:
- First come, first serve:
This is the default option. As soon as the number of participants in the lobby equals groupSize they are matched and can start interacting. This setting aims to minimize waiting time.
Before the lobby, experimenters can assign different roles to players (using the variable role in the core table). The other two available types of matching make use of this variable role to form groups.
- match groups with unique roles:
In some cases you might want to allocate roles before you assign participants to groups. Before participants enter the lobby, they can be assigned a role (by setting their variable role in the core table. Roles need to start with 1, and run up to value value of the groupSize. For example, if you have groups of 3, a group will be formed as soon as a set of players with roles 1, 2 and 3 can be formed.
- Group with the same role:
Groups are formed of participants with the same role. This is useful when you have different treatments in the same session, and participants from the same treatment need to be grouped together.
Countdown timer
In interactive tasks, it is often useful to set timers on decisions to keep up the pace of the experiment. Countdown timers prompt participants to give responses within a set time, and reduces the waiting time for their group mates, which in turn reduces inattention and dropouts.
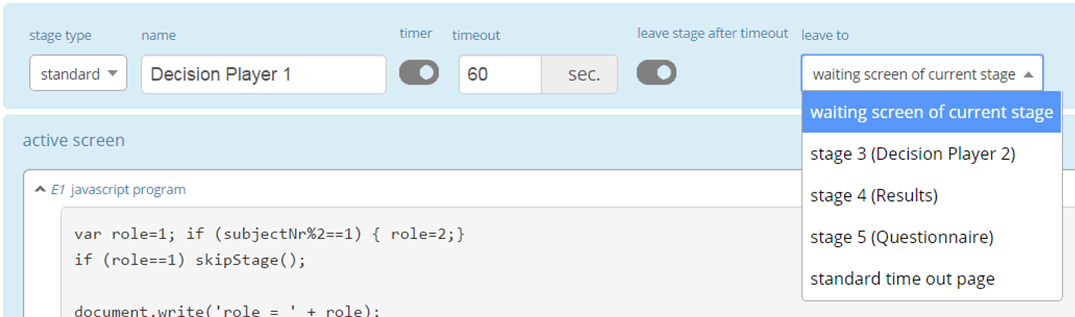
To add a timer to a participant screen, click the timer switch on the top of the stage. Set the time (in seconds) that participants can take to submit their response. If the option leave stage after timeout is switched off, nothing will happen once the timer reaches 0. If this option is switched on, you are prompted to define the stage to which non-responsive participants are directed to. You can choose a stage that you defined yourself, or choose the standard timeout page. This page will show the participants the message that is specified in the parameters table. You can also choose to direct non-responsive participants to the waiting screen of the current stage. In that case, make sure that the experiment can continue, e.g. by filling out a default response by the participant so that results can be calculated.
Note
If you automatically direct all participants to a stage on timeout, they may arrive at different times at the next page (due to different internet speed). They are not directed to a waiting screen in this case. To avoid this behavior, you should add another stage with a continue button and then “wait for others” on the waiting page. This guarantees that synchronisation is done correctly.
Note that in JavaScript , the number of seconds in the countdown timer can be manipulated with the variable TimeOut. This is useful if you want to give participants more time in early rounds. The below example illustrates this.
if (period < 3){
  TimeOut=120;
     }
Note
On the participant screen, countdown timers are coded as an outer div called ‘countdown’, with two inner divs with HTML id’s ‘countdown_text’ (which you might want to replace with JS if your experiment is in another language) and ‘countdown_timer’ (showing the number of minutes/seconds left).
Elements
Note
Input elements will be automatically recorded in the decisions table. Make sure that each input element has a unique ‘variable name’. Please avoid using variable names that may interfere with PHP, such as ‘order’, ‘sort’, ‘where’, ‘connect’, and ‘create’. This will lead to errors on the participant’s page.
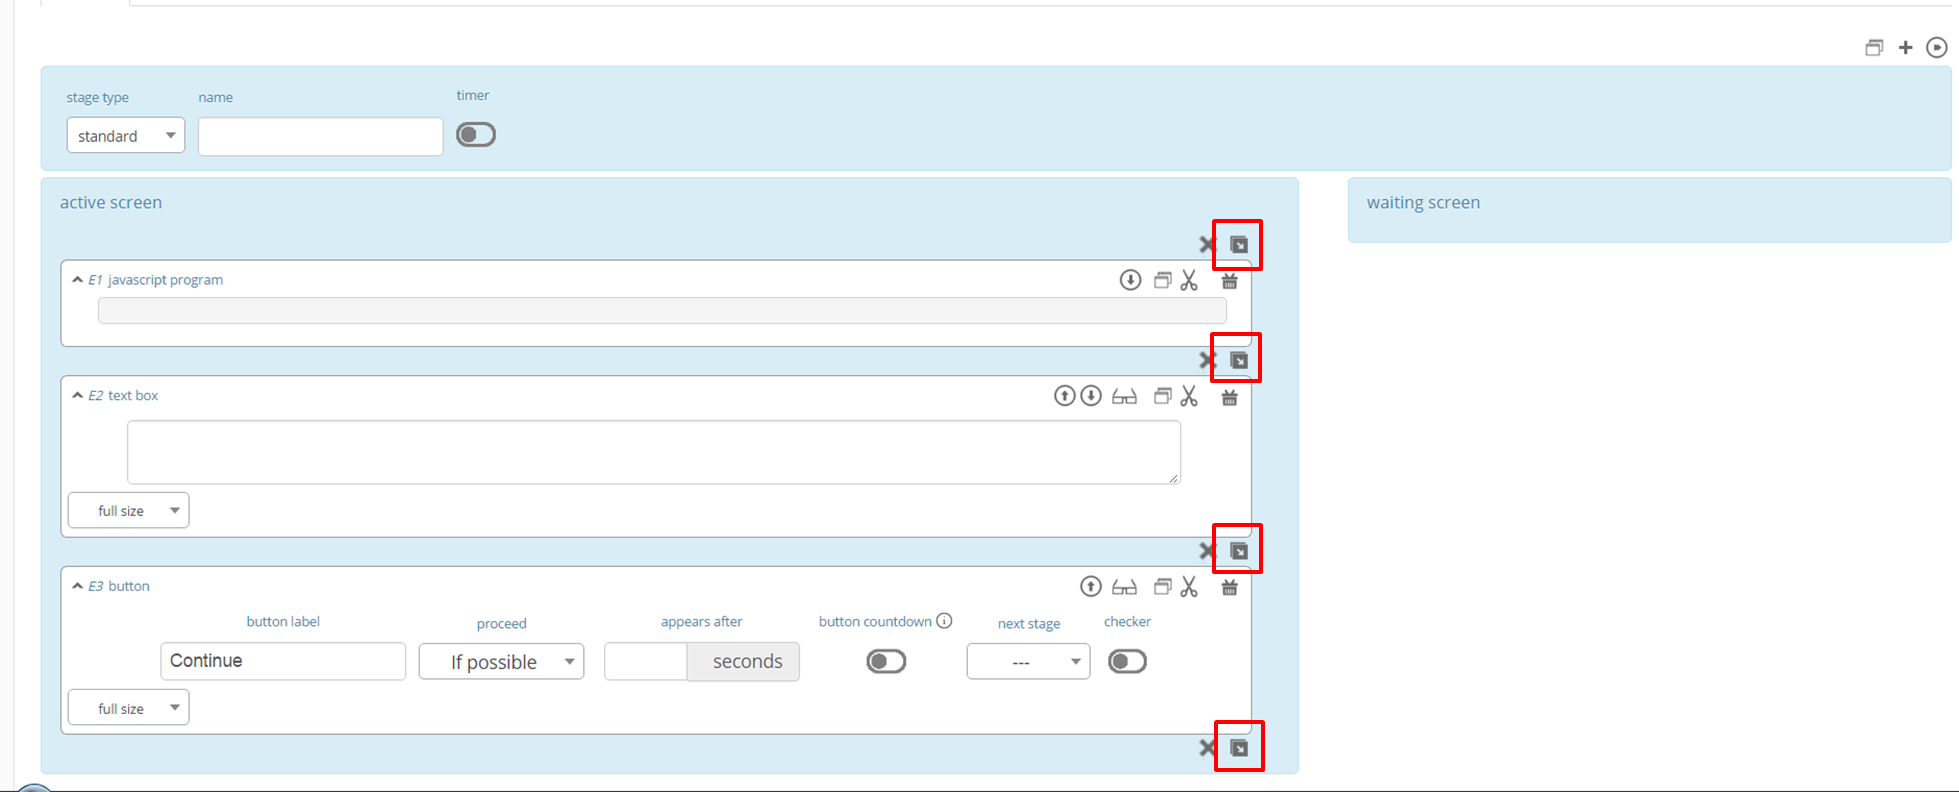
Adding an element
You can add a new element to a stage by clicking on the drop-down menu add new element.
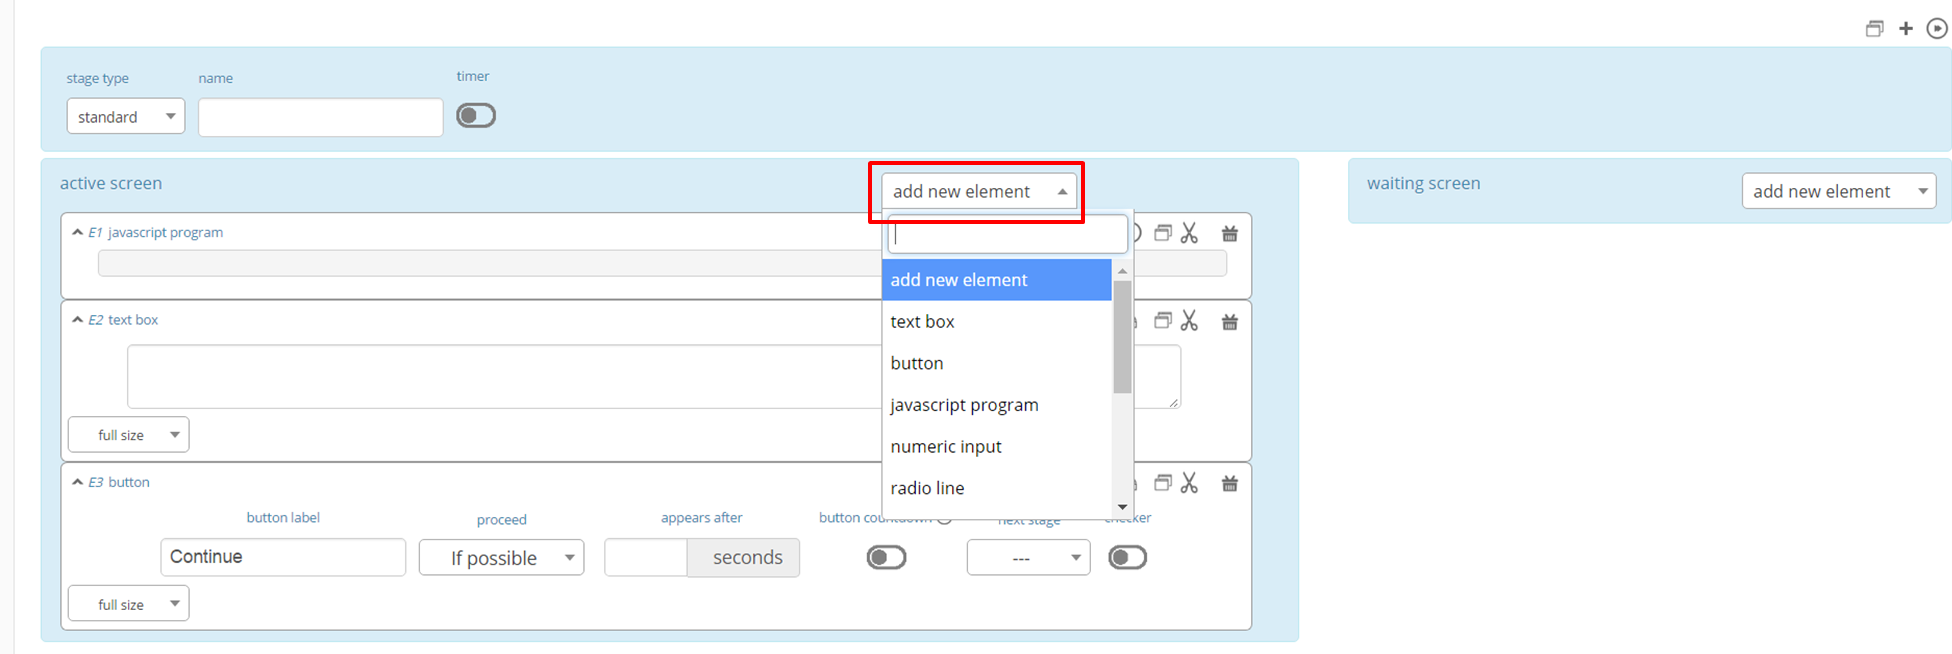
Once you have clicked on the element type of your choice, you paste it by clicking on the ‘paste’ button.
Generic properties of elements
Move element
move up

move down

Display condition

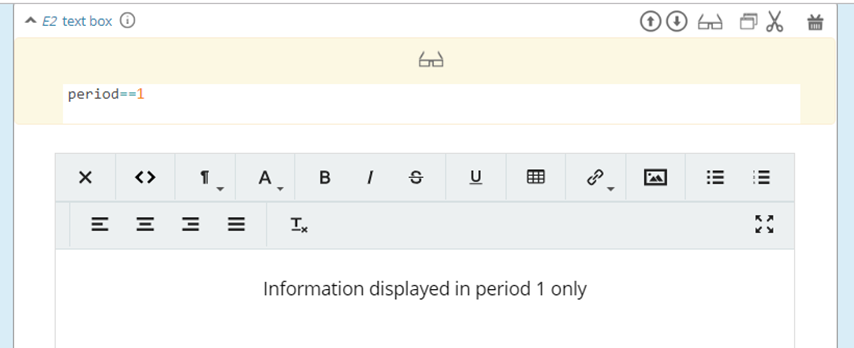
For each display element, you can use the JS variables defined above it (as well as global variables) to specify display conditions. These conditions are evaluated in JavaScript directly. This means that setting display conditions for elements, you do not need the dollar signs to refer to variables.
JavaScript elements do not have display conditions. Display items generated by JS (written to the participant screen with, e.g., document.write() ) will be placed at the position of the JS element.
For example, if you want to display a text box in period 1 only, you can define its display condition as follows:
Note
do NOT use calls to the server in this condition (like getValue()) because this will slow down the page (as the display conditions are checked very frequently; the number of requests will overload the server).
Copy element

Cut element

Delete element

Element types
Text box
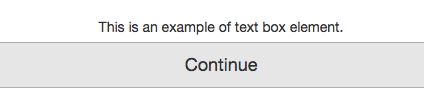
Here is an example of how textbox element looks like:

This text box element will show the following text to the participants.
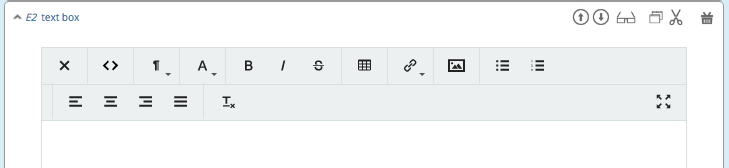
In the textbox element, you can insert text, such as the description of your experiment. When you double click the area inside the text box, a user friendly WYSIWYG editor will appear.

In this interface you can adjust text fonts and colour, but you can also use standard HTML. You can toggle between WYSIWYG and HTML view by double clicking in the editor. By clicking the < > sign you can toggle back and edit the HTML directly.
Note
A text box allows for basically all standard HTML content. If you want to show images, you can load these in the standard HTML way, using the <img> tag, referring to the location (e.g. the url) of its source file. If this location is not secure (http), you might need to allow insecure content on the lioness.uni-passau.de site (which is https). Otherwise, your browser might block the images from being shown in the developer environment. As can be seen here (https://stackoverflow.com/questions/10311092/displaying-files-e-g-images-stored-in-google-drive-on-a-website), Google Drive is a good solution for showing (linking) images to be shown in LIONESS, including the developer environment.
Note
Do not use $$ in the textbox as this will be not interpreted correctly.
Button

The Button element mainly functions as a trigger to move on to the next desired stage. There are six sub elements in the Button element. They are like the following:
- Button label:
You can define the name of the button which will appear to the participant, in this case continue.
- Proceed:
In the proceed element, you can define whether pressing the button automatically leads to the next desired page or wait until all other participants press the button so that all participants can continue simultaneously. For the former case you can select if possible, and for the latter case you can select Wait for others.
Note
All buttons on one stage should all have the same setting: all Wait for others. or all if possible. If you mix the two options, some players A wait for players B of their group which already have proceded (due to players B having if possible). Players A will then never be pushed forward.
- Appears after:
If you would like to set a restriction that participants can proceed only after some amount of time, then you can define after how many seconds will the participants be able to proceed to the next stage. If you wish not to use this function, then you can just leave it as it is.
- Button countdown:
If this is activated, then a countdown is shown until the button appears.
- Next stage:
In this menu, you can define onto which stage the experiment proceed. Default is it will proceed to the next stage so you can just leave it as it is if this is the case, but you can also define it to jump to another page. Jumping to another page is useful when you want to skip certain pages in the middle.
- Checker:
If you want to execute JavaScript code when a participant clicks a button, you can use the checker element. One useful application of this option is checking whether two values in two separate input fields add up to a certain value, for example:
if (value1+value2 != 10) {
   showError('The total number should be 10!');
   return false;
   }
Note
Buttons have an outer div with the id “buttonXX” where XX is the ID of the element. They have an inner div with the id “buttonclickXX”, which binds the onclick event. The innerdiv is also member of the class “lionessbutton”.
JavaScript program
JavaScript programs allow you to interact with the server and do calculations. A set of pre~defined functions is available to get variables from the database and to write data to the database tables. When you start defining your JavaScript element, LIONESS Lab will open an editor.

By default, JavaScript programs will be executed in the participants’ browsers when the page loads. One exception to this is the checker functionality in button elements, which is executed once the button is clicked.
Note that JavaScript elements allow for great flexibility. For example, with a bit of programming experience you can add design your own display items (e.g. in an SVG canvas), add interactive elements to your page revealing information upon mouse~click, or animate items in your screen. We have a few examples available.
Also note that JavaScript is a language widely used by web programmers. The large user base ensures that you will be able to solve the vast majority of your programming issues with a simple Google search.
JavaScript programs are limited to 500 lines.
Numeric input
An example of using numeric input element in an experiment is like the following.
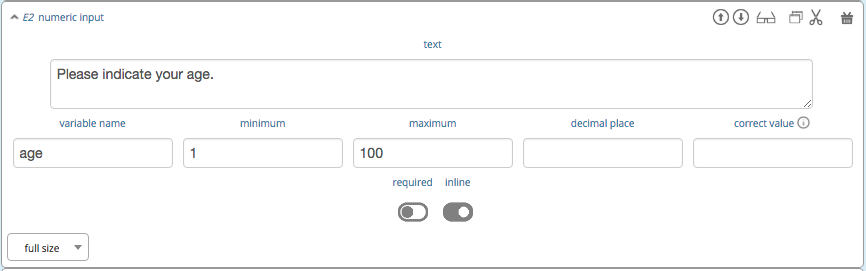
This content will show the following screen to participants.

In this element, you can collect participant’s responses in numbers.
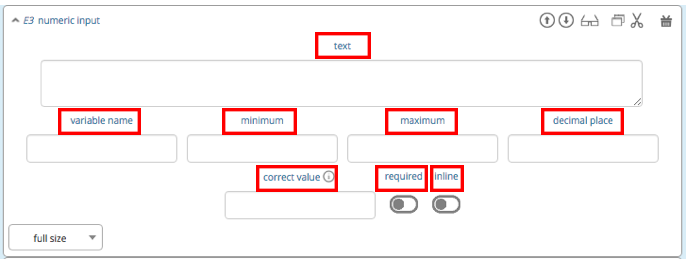
- Text:
You can set the question to which the participants will be answering.
- Variable name:
You can set the name of the variable of the numeric input. This will be handy later on when you have to use the participant’s answers in Javascript or for analysis.
Note
Avoid using variable names that may interfere with PHP, such as ‘order’, ‘sort’, ‘where’, ‘connect’, and ‘create’. This will lead to errors on the participant’s page.
- Minimum:
You can define the minimum value which participants can enter. If this condition is not met, a warning message will appear to the participants.
- Maximum:
This is the maximum value the participants can enter. Like minimum, when participants enter a value which exceeds this value, then a warning sign will appear.
- Decimal place:
- Correct value:
Optionally, you can set a correct value for the participants’ answer. If the participant’s response does not match this value, a warning sign will appear and participants will not be able to proceed to the next stage.
- Required:
If you activate this element, then the participants will be able to proceed only if this input field is answered.
- Inline:
Display the input field next to the text.
Radio line
An example of the radioline produced by this element looks like this:
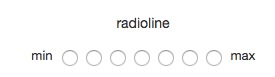
In this element, you can make a scale on which the participants can choose their discrete numerical answer.
Adding a radio line element prompts you to define the following:
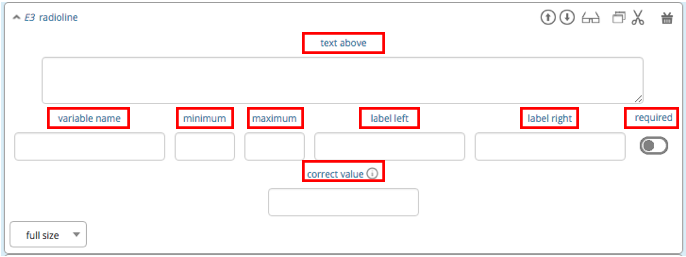
- Text above:
Define the question to which the participants will answer. It will be located where radioline is in the example.
- Variable name:
You can set the name of the variable of the numeric input. This will be handy later on when you have to use the participant’s answers in Javascript or for analysis.
- Minimum:
The minimum value is the value of the leftmost option of the radioline. However, the absolute value of the minimum option does not appear to the participants. Subtracting maximum value by minimum value determines how many dots (options) there are between minimum and maximum value.
- Maximum:
The maximum value is the value of the rightmost option of the radioline. However, the absolute value of the maximum option does not appear to the participants. Subtracting maximum value by minimum value determines how many dots (options) there are between minimum and maximum value.
- Label left:
You can assign a name for the lowest value on the radio line. For example, if you were to indicate in a scale of 1 to 7 about liking, then usually the value on the left is most negative.
- Label right:
You can assign a name for the highest value on the radio line. For example, if you were to indicate in a scale of 1 to 7 about liking, then usually the value on the right is most positive.
- Required:
If you activate this element, then the participants will be able to proceed only if this input field is answered.
- Correct value:
Optionally, you can set a correct value for the participants* answer. If the participant’s response does not match this value, a warning sign will appear and participants will not be able to proceed to the next stage.
Slider

This is an example of how a slider element looks like to the participants.
In this element, you can make a slider on which participants can indicate their discrete numerical answer by sliding the button onto a certain location in the slider. It is basically same as radio line.
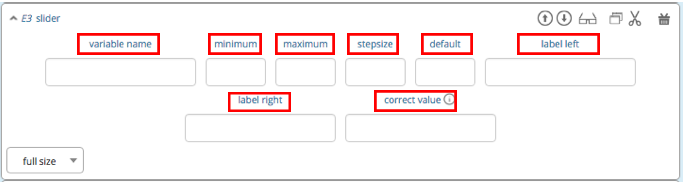
- Variable name:
You can set the name of the variable of the numeric input. This will be handy later on when you have to use the participant’s answers in Javascript or for analysis.
- Minimum:
The minimum value is the value of the leftmost option of the slider. However, the absolute value of the minimum option does not appear to the participants. Subtracting maximum value by minimum value determines how many dots (options) there are between minimum and maximum value.
- Maximum:
The maximum value is the value of the rightmost option of the slider. However, the absolute value of the maximum option does not appear to the participants. Subtracting maximum value by minimum value determines how many dots (options) there are between minimum and maximum value.
- Stepsize:
This indicates the unit which the button can be incremented or decremented along the slider. For example, if the stepsize is big, then the distance among possible locations of the button will be also larger.
- Default:
The starting position of the slider. This is the value that the slider takes when it is not moved by the participant.
- Label left:
You can assign a name for the lowest value on the slider. For example, if you were to indicate in a scale of 1 to 7 about liking, then usually the value on the left is most negative.
- Label right:
You can assign a name for the highest value on the slider. For example, if you were to indicate in a scale of 1 to 7 about liking, then usually the value on the right is most positive.
- Correct value:
Optionally, you can set a correct value for the participants’ answer. If the participant’s response does not match this value, a warning sign will appear and participants will not be able to proceed to the next stage.
Discrete choice
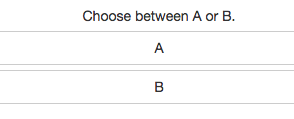
This is an example of a discrete choice element shown to the participants.
Discrete choice element is basically just like a multiple~choice question. Participants can choose their answers among the given options.
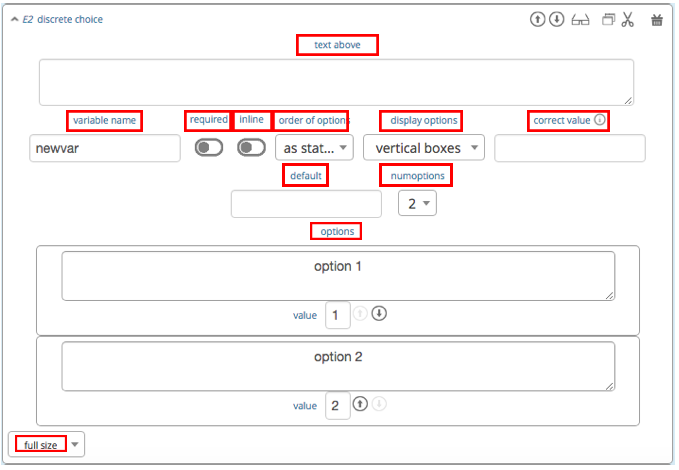
- Text above:
You can set the question to which the participants will be answering.
- Variable name:
You can set the name of the variable of the discrete choice the participants will make.
- Required:
If you activate this element, then the participants will be able to proceed only if this input field is answered.
- Inline:
Display the input field next to the text.
- Order of options:
There are two ways of presenting options - one is as stated and one is random. In the former case, the order of options will appear exactly how the experimenter arranged the order, and for the latter the order of options will be random for each subject.
- Display of options:
There are three ways to display options - vertical boxes, horizontal boxes, and dropdown list.
- Correct value:
Optionally, you can set a correct value for the participants’ answer. If the participant’s response does not match this value, a warning sign will appear and participants will not be able to proceed to the next stage.
- Default:
- Num options:
Here, you can define among how many discrete choices the participants can make their choice.
- Options:
You can write the name of the options which will be appeared to the participants. Also, presenting images instead of text is possible by providing a link:
<img src = link of the image>. Beware that the image should be uploaded on another open access website. The ‘value’ for each options will be recorded to the database, and can be used for later analysis or Javascript program.
Reference

Here, you can refer to a previously created element. When you change the original element, the element reference will change along with it. You can only refer to an element from your current experiment.
Text input
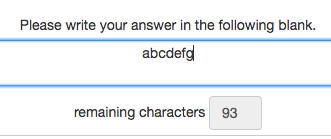
This is an example of a text input element shown in the actual experiment.
- Variable name:
You can set the name of the variable of the numeric input. This will be handy later on when you have to use the participant’s answers in Javascript or for analysis.
- Minimum characters:
Optionally, you can define minimum number of characters the participants should enter in this input field before proceeding to the next stage.
- Maximum characters:
Optionally, you can define maximum number of characters the participants can enter in this input field.
- Number of rows:
The vertical size of the box (the number of lines that is displayed).
- Required:
If you activate this element, then the participants will be able to proceed only if this input field is answered.
Back button

- Button label:
You can define the name of the button which will appear to the participant, in this case back.
- Back to:
In this menu, you can define onto which stage the experiment will go back. The default setting is it will go back to the stage right before so you can just leave it as it is if this is the case. You can also define it to jump to another page.
Note
Buttons have an outer div with the id “buttonXX” where XX is the ID of the element. They have an inner div with the id “buttonclickXX”, which binds the onclick event. The innerdiv is also member of the class “lionessbutton”.
JavaScript
LIONESS experiments use JavaScript to do calculations and to interact with the database JavaScript (JS) is a widely used language for web programming. JS is executed in the browser of the participants (so, not on the server).
JavaScript code can be added to any stage of your LIONESS experiment through a JavaScript element.
Warning
If you use comments in your code, you should always use /* comment */ instead of // comment. Some browsers (Safari) may misinterpreted commenting out single lines with //.
Access JS variables
Values of JS variables can be accessed in other elements (e.g. a text box) by adding dollar signs on both sides of the variable name (e.g. $contribution$).
Default variables
When a participant’s page loads, all variables defined in the globals table are loaded. This is also true for the following default variables from the core table. This means that these variables are defined (i.e. have a value) in every screen and their values are accessible in JS.
Variable name |
Details |
|---|---|
playerNr |
Number of the focal player within the session |
groupNr |
Group number of the focal player |
subjectNr |
Number of the focal player within group |
period |
Period number of the focal player within session |
tStart |
System time in seconds upon page load |
currentGroupSize |
Total number of players in the current group |
role |
The role of the current player, used for matching |
bot |
Is the current player a bot |
randomid |
The randomid to handle payment |
Note
It is advisable to not change the variables loaded from the globals table.
Note
The difference between playerNr and subjectNr is that subjectNr are unique within a group and only assigned when the group is formed in the lobby. E.g. if the playerNr 3, 5, 7 and grouped together in the lobby, the get the subjectNr 1, 2, 3. SubjectNr are always sorted according to the playerNr.
Interacting with the database
LIONESS experiment reply on a combination of JavaScript (code that is executed in the participants’ browsers), and PHP (to generate the web pages on the experimental server) and MySQL (for managing the database).
Variables specified in input elements’ (numeric input, choice buttons, etc) will be automatically stored in the table decisions. These variables have to have unique names. Using duplicate names can lead to unexpected behaviour of the experiment.
JavaScript elements allow you to read from and write to the database, using the below functions. Note that each function has a simple and a full version. The simple versions always assume that the function pertains to the current player, the current group, and the current period (and uses the decisions table). In the below examples, the simple and full versions are equivalent.
Warning
Italic function parameters are optional.
Writing to the database (tables decisions, session and core)
You can directly write to the decisions table of the experiment’s database, using the following functions.
Note
You can use the functions to write to the tables decisions, session and core. If you want to write to the globals table, please use setGlobal(variable name, value) described below. There is only one globals table for all participants, while each participant has its own entry in all the other tables. If you write to
Warning
Make sure that the variables you write to the database have unique names. SQL is not case sensitive, that is variable and Variable are considered non unique! In addition, for database management reasons, it is currently not possible to create new variables in the database using for loops or while loops. In addition, avoid using the record() function inside if (or else) statements. Create the variable before the if statement and use setValue() inside the if statement.
- Function:
setValue()
- Arguments:
table name, condition, variable name, value
- Simple example:
setValue(‘payoffThisPeriod’, payoff);
- Full example:
setValue(‘decisions’, ‘playerNr=’+playerNr+’ and period=’+period, ‘payoffThisPeriod’, payoff);
The function setValue() will update the value of an existing variable in the database, which may be created with a standard input element or with the record() function (see below).
- Function:
record()
- Arguments:
variable name, value
- Simple example:
record(‘PGGshare’, publicGoodShare);
The function record() will create a variable in the decisions table with the name of the first argument and the value of the second argument. In the example above, the decisions table would have one column with the name ‘PGGshare’, which would equal the value of the JavaScript variable ‘publicGoodShare’.
- Function:
setBonus()
- Arguments:
amount
- Simple example:
setBonus(payoff);
The function setBonus() will write the value in its argument to the variable bonusAmount in the ‘sessions’ table. It will also update the variable totalEarnings in that table to the sum of bonusAmount and participationFee.
Warning
The value argument cannot contain any operators, such as the + or the - sign.
- Function:
setRole()
- Arguments:
role
- Simple example:
setRole(role);
The function setRole() will write the value in its argument to the variable role in the core table. The variable role is used for the matching procedure
- Function:
setValueAtTimeout()
- Arguments:
table name, condition, variable name, value
- Simple example:
setValue(‘payoffThisPeriod’, payoff);
- Full example:
setValue(‘decisions’, ‘playerNr=’+playerNr+’ and period=’+period, ‘payoffThisPeriod’, payoff);
The function setValueAtTimeout()`works the same as `setValue() but can be called to store values when the page is left at timeout (when the timer is running out).
Writing to the database (table globals)
For writing to the globals table, some special functions exist. Keep in mind, that all subjects have a joint globals table (while each subject has its own entry in the other tables). If you write to the globals table, subjects may overwrite each other’s changes.
- Function:
setGlobal(variable name, value)
- Arguments:
variable name, value
- Full example:
setGlobal(‘totalPlayers’, 20);
The function setGlobal() will update the value of an existing variable in the globals table. Custom global values can be created in the parameter section.
- Function:
incrementGlobal(name)
- Arguments:
variable name
- Returns:
the incremented value of the variable
- Full example:
incrementGlobal(‘totalPlayers’);
The function incrementGlobal() will increment the value of a global variable by 1. It only works for integers. This function is useful for counting e.g. numbers of players, etc.
Note
If you use a global counter, you should use incrementGlobal() instead of getGlobal() and setGlobal(). The problem with the latter is that in between the two function calls another subject may also call the function and it may not return the correct values. IncrementGlobal() is safe to this problem.
Reading from the database
Note
You can use the functions to read from the tables decisions, session and core. If you want to read from the globals table, please use getGlobal(varriable name)
- Function:
getValue()
- Arguments:
table name, condition, variable name
- Return value:
one element
- Simple example:
getValue(‘someVariable’);
- Full example:
getValue(‘decisions’, ‘playerNr=’+playerNr+’ and period=’+period, ‘someVariable’);
This function retrieves a single value from the database. NB: the ‘simple’ example will return the value from the current player in the current period. If no value is found, the function returns null.
- Function:
getValues()
- Arguments:
table name, condition, variable name, sort by
- Return value:
array
- Simple example:
getValues(‘someVariable’);
- Full example:
getValues(‘decisions’, ‘groupNr=’+groupNr+’ and period=’+period, ‘someVariable’,’playerNr’);
This function retrives the values from different players and gives back an array which is sorted by playerNr. It starts with index 0.
There are special functions for retrieving the values from others in the group, in the current period.
- Function:
getValuesOthers()
- Arguments:
variable name
- Return value:
array starting from 0 ordered by subjectNr
- Simple example:
getValuesOthers(‘someVariable’);
Note
To access individual values in the array returned by this function, you need to use indicators for its elements (e.g., someVariable[0]).
In addition, there are functions for retrieving the values from the PREVIOUS period.
- Function:
getOldValue()
This function is similar to getValue() but retrieves the value from the previous period.
- Function:
getOldValues()
This function is similar to getValues() but retrieves values from the previous period.
Note
These functions write to and read from the database on the server in an asynchronous way (that is, the functions are executed one by one). Having many instances of getValue() on a single stage may lead to heavy load on the server. Please make sure to use these functions sparingly, and avoid using them in for-loops. Oftentimes, multiple getValue() requests can be replaced by a single getValues() request. This will improve speed. Perhaps more importantly, to use a server with sufficiently high computational power when collecting your data.
JavaScript code snippets
Parameters
The parameters of your LIONESS experiment are set in this menu. Your settings are stored in the globals table. In each participant screen, the parameters defined here are available through JavaScript. The variable names are exactly as described here.
The menu contains three tabs: predefined parameters, messages and custom parameters.
Predefined parameters
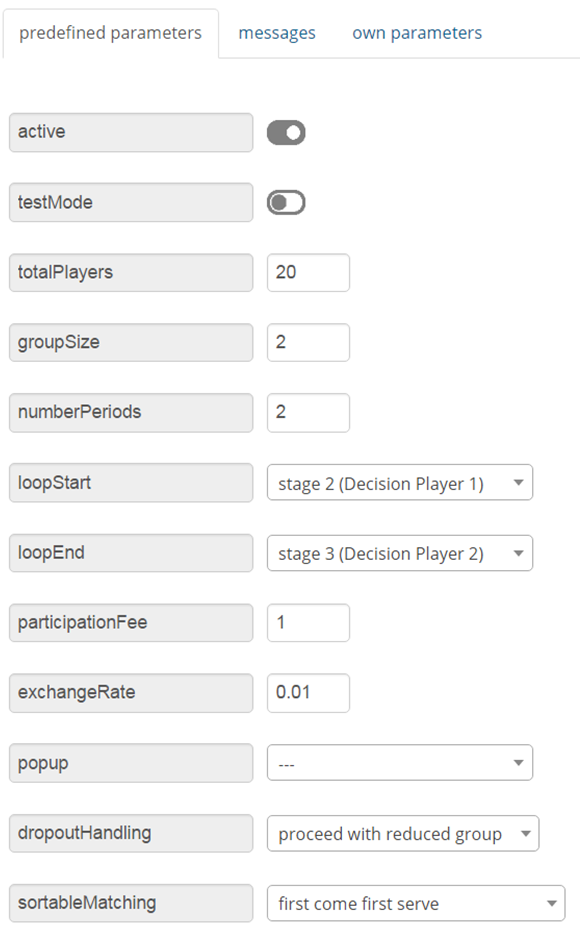
active
This parameter regulates whether the experiment is active, and is set in the control panel. When the experiment is active, the value of this parameter is 1, otherwise it is 0. Participants can only enter active experiments.
testMode
This parameter regulates the test mode, and is set in the control panel. In the test mode, multiple participants can be operated from the same browser, using different tabs. This is useful when developing your LIONESS experiment. TestMode can be set in the Control panel and should not been changed here.
totalPlayers
This parameter sets a cap on the total number of participants allowed to enter an experimental setting. In test mode the cap is removed. When a participant tries to enter a session after this number has been reached, they will be redirected to a screen displaying a message1 indicating that the current session is full.
groupSize
This parameter defines the size of the groups. Once the number of participants waiting in the lobby equals this number, the controller algorithm will match them into a group and pushes them to the next stage. Typically, this next stage will be thefirst stage of a period (see loopStart).
numberPeriods
This parameter defines the total number of periods in the experiment. Periods start with the stage defined in loopStart and end with loopEnd).
loopStart
The parameter defines which stage is the first stage of a period. When a group reaches the stage define in loopEnd, all participants in that group will be directed here, if the period number has not reached the value set in numberPeriods.
loopEnd
This parameter defines which stage is the last stage of a period. When a group reaches this stage, the period number of this group will be increased with 1, and all members will be redirected to the stage defined in loopStart. When the period number has reached numberPeriods, the group will proceed to the stage defined right next to this stage. Note that in the last stage of a period, participants will typically have to wait for all of their group mates to finish the period, that is, they have to wait for all before they can proceed.
participationFee
This parameter sets the guaranteed participation fee, which participants will receive independently of their performance in the experiment.
exchangeRate
The exchange rate can be used to convert experimental points into real money.
dropoutHandling
This parameter defines how dropouts should be handled. There is not much a software can do for participants who lose their connection to the experimental server (e.g. due to unstable internet), or close down their browser in the middle of an experimental session. Participants who dropped out by failing to respond within the set time will be directed to a screen displaying a message indicating that their task is over.
LIONESS experiments automatically notice dropouts like these, and will de-register disconnected participants from the experiment. Technically, upon dropout, the controller algorithm (activated with the script behind the heartbeat in the Control panel) reduces the variable ‘currentGroupSize’ with 1, for all the participants in the group of the participant who dropped out. From the parameter menu, you can choose from three options defining how to deal with the other group members.
- terminate group:
If one participant drops out, the other participants in their group will be led to a screen displaying a message indicating that one of the group mates has dropped out and that the session is over. When you choose this option, consider taking measures to compensate these group mates as they might expect to earn some more in the periods they will not be able to complete due to this dropout.
- proceed with reduced group:
This is the default setting. Once a participant drops out, the other group members continue with a group reduced in size. The variable currentGroupSize in the core table will be reduced with 1. When you choose this option, consider adding a warning message to the other participants. For this you can use a JS element that displays a message under the condition that currentGroupSize < groupSize. Finally, please keep in mind that in many cases, the data generated by groups reduced in size requires special treatment in analyses.
- disable exclusion:
This option is best used for individual (non-interactive) tasks, or when you deploy LIONESS in the laboratory (that is, not with participants recruited online), where dropouts are atypical. When a participant loses connection to the server (e.g. due to network problems), you can try to solve this without the participant dropping out. The other members of the group typically wait and continue once the problem is solved.
Note that currently, LIONESS Lab does not have any standard measures in place to have dropouts replaced by other players, or by bots. In case you are considering an experimental design with features like these, you can program this manually using JavaScript elements in the appropriate (decision) screens. Note that, however, the data stemming from groups that include computer-generated responses may be compromised, and may require careful consideration in any analyses. We are aware of at least some experimenters having used techniques like this in LIONESS Lab. Do not hesitate to get in touch if you require further information on this.
sortableMatching
This defines how the participants in the lobby are matched in groups. There are three options to choose from.
reEnter
This parameter is default set to 0, which means that participants cannot re-enter once they have been excluded from an experiment (due to timeouts). With being turned on, a participant can re-enter and is directed back to the stage where he or she left (if the participants uses the initial link from the experiment).
Messages
Each experiment contains a page with messages tell participants that their session has terminated prematurely. These messages are necessary for clear communication with participants upon dropouts, and to provide information as to why they cannot proceed with the session. Each of the messages has a default text, which can be edited in the messages tab. Messages are displayed conditional upon the event that triggered the termination (see below). You can find more information when a certain event is triggered in the experimental flow section.
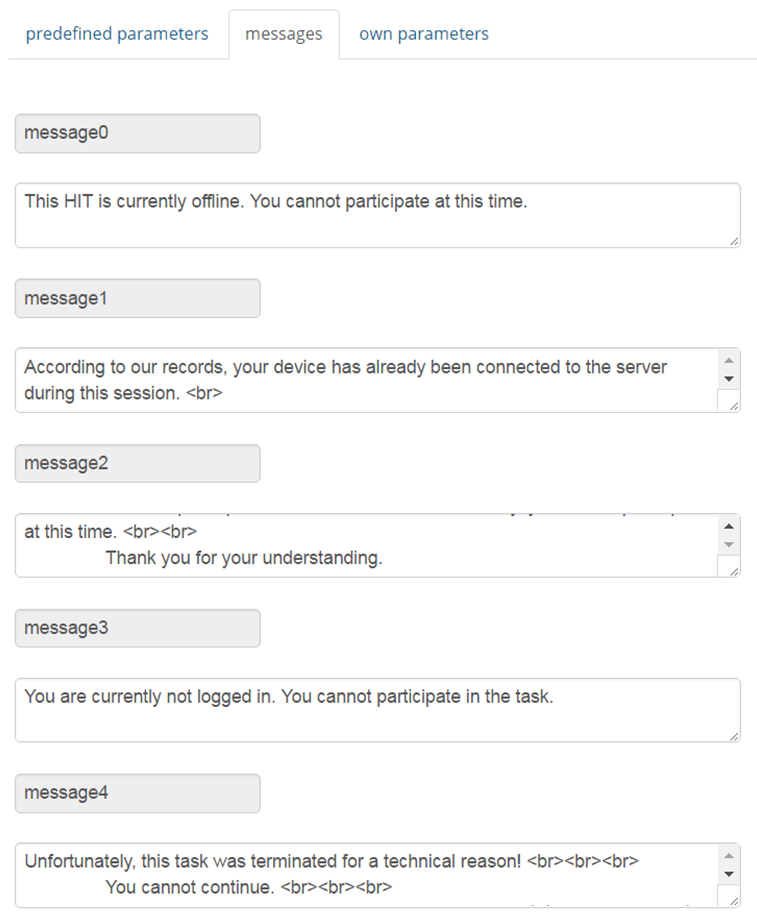
- message0:
The experiment is currently not active (see active).
- message1:
A participant tries to connect to the server while they are already connected.
- message2:
The maximum number of participants for this session has already been reached.
- message3:
The participant is not connected to the server.
- message4:
The participant has been manually removed from the session.
- message5:
The participant did not make a decision within the set time. They are removed from the session.
- message6:
The participant’s group has been terminated due to a dropout of a fellow group mate. This is only used when the dropout handling has been set to terminate group.
- message7:
The participant tries to enter a session using Internet Explorer. This browser is not supported.
- message8:
The participant has not successfully completed the control questions after the set number of attempts. They cannot continue.
Custom parameters

You can add your own parameters by clicking the + sign. In the left hand side field you can give the variable a name, and in the right hand side field you can set its value. Only numerical values are supported. The parameter will be available for JavaScript in all the participant stages. You can delete your parameters by clicking the bin icon.